18 October 2016

Chicken, Spam Bacon, and Ranch Pasta!

Yes, you read that correctly... we made a CBR pasta, but with Spam Bacon instead of regular bacon!

Before you turn your nose up at the mention of Spam, let me explain why I like to use it.  First off... I really hate cooking bacon; it splatters everywhere, it leaves a strong lingering smell, and even baking it leaves a cookie sheet an absolute mess.  It tastes great, but it really is not worth the hassle for me.  


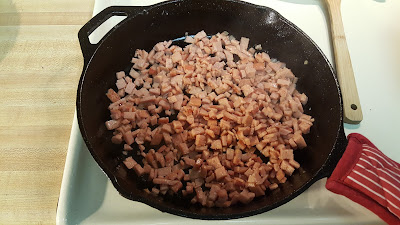
If you have ever had the bacon-flavored Spam cooked to crispy perfection, you know fully well how perfectly bacon-y it tastes.  There are numerous benefits besides the taste: it's easy to slice; it stays flat on the pan; it makes its own fat to cook in the pan as it heats up; when it's got just a little char, it has a wonderful texture (and I honestly prefer the texture over regular bacon).  What it lacks is all the hassle associated with bacon: it does not curl up and cook unevenly, the fat rendered in the pan is not excessive and does not splatter everywhere, and it is quicker and easier for both prep and clean-up.  Also, the perfect texture is achieved when cooking it in a cast-iron skillet:


Now, on to the dish at hand.  It was relatively easy, and it was adapted from this recipe.  I was looking for a dish that would highlight the often-overlooked wonder that is Spam and dispel the stigma that it seems to carry with some people.  This dish definitely succeeded!

Ingredients:

  • Margarine (use as needed)
  • 1 container SPAM Bacon
  • ~1 lb boneless, skinless chicken thighs (excess fat trimmed off)
  • seasonings to taste
  • 2 tbsp flour
  • 1 packet ranch seasoning mix (2 packets if you want extra flavor)
  • ~2 cups heavy cream
  • 1 cup shredded cheese

First, dice most of a container of Spam Bacon and add it to the preheated cast-iron pan, with just a tablespoon of margarine for a little extra fat (it helps keep any of the Spam from sticking to any portions of the pan that aren't as seasoned).  Stir it frequently, to make sure all sides of each cube get browned.  Once you see some nice charring, remove from heat and let rest in the pan.

Next, take some boneless, skinless chicken thighs and coat them on both sides with a blend of seasonings of your choice (we used oregano, basil, rosemary, and garlic powder).  Heat a large skillet with four tablespoons of margarine, and cook the chicken until done... do not hesitate to add more margarine as you cook, to keep the chicken nice and juicy.  Remove from heat and let rest in the pan.

Next, cook about 3/4 lb of a pasta of your choice (any will do fine) al dente; drain and set aside.

Return the chicken to heat.  Sprinkle on the flour and ranch packet(s).  Add the heavy cream along with about a half cup of water and stir well.  Once the mixture is bubbly, add the cheese (we used shredded white cheddar) and about half of the Spam.  Once the cheese is fully incorporated and the sauce is bubbly again, add your pasta to the skillet (if the noodles have begun drying and sticking to each other, give them a quick rinse to loosen them).  Combine well and top with the rest of the Spam.


Last step is to enjoy!  If you are skeptical about using Spam Bacon in place of regular bacon, please give this dish a try.   It was truly tasty and satisfying!
23 June 2016

Fruity Pebbles Cheesecake!

We have our annual summer company picnic this week at work, and I usually participate in the bake-off.  Last year I made my beer bread, which ended up tasty, but this year I wanted to make something more like a dessert.  I decided I would try something new and make a cheesecake for the first time ever... and I thought it would be a good idea to try making a Fruity Pebbles cheesecake!


It came out really nicely, especially for this being my first attempt at a cheesecake!  It may not look quite as pretty as what you would expect at Cheesecake Factory, but it really tastes wonderful and has a nice texture.  The recipe I came up with is below!  It is basically a classic New York cheesecake with my own modifications.  It is not too heavy or dense... the texture is actually relatively light and the fruity pebbles give it a nice brightness!

For the topping, I made the last-minute decision to prepare a glaze with the fruity pebbles... a touch of butter, some water, and confectioner's sugar, all reduced to a syrup in a small skillet, then I tossed some fruity pebbles into it.  It sort of made a brittle/crumble kind of topping.

Fruity Pebbles Cheesecake

Prep               30 m
Cook              <1 h
Ready In        overnight
Yield               2 pie pans +extra
 
Ingredients
½ cup graham cracker crumbs, x2
¾ cup crushed fruity pebbles, x2
4 tablespoons butter melted, x2
1 heaping cup additional fruity pebbles
30oz cream cheese
1 1/3 cups white sugar
3/4 cup milk
4 eggs
1 cup sour cream
1 tablespoon vanilla extract
1/4 cup all-purpose flour

Directions
1.)  Preheat oven to 350 degrees Fahrenheit. Grease two 9 inch pie pans.
2.)  In a medium bowl, mix graham cracker crumbs and crushed fruity pebbles with melted butter. Press onto bottom of pie pans.
3.)  In a large bowl, mix cream cheese with sugar until smooth. Blend in milk, and then mix in the eggs one at a time, mixing just enough to incorporate. Mix in sour cream, vanilla, flour, and ½ cup fruity pebbles until smooth. Pour filling into prepared crusts.  With the leftover, I poured the rest into a muffin tin prepped with cooking spray, and it was just enough to fill each portion of the pan.
4.)  Bake in preheated oven for 35-40 min (take out muffin tin about 15 minutes early).  Turn the oven off, and let cake cool in oven with the door closed overnight; this prevents cracking. Chill in refrigerator until serving.

20 June 2016

My Google Local Guides food crawl in Indianapolis was a success!

For Google Local Guides Meet-Up Day on 18 June 2016, I organized a food crawl on the north side of the city.  The group had a great time... we all got to enjoy some awesome food and hospitality!
 
 
We got to Big Mike's Café and they already had plenty of space ready for us.  As always, Katie greeted us as if we were family and took great care of us as we waited on the others.


As we waited for others to arrive, we started off with an order of the garlic parmesan bread knots... these things are absolutely addictive.  Also, the other cool thing about them is that I got them for free!  The restaurant uses SpotOn, a rewards app where guests get a point each time they check in at the counter.  Only 5 points gets you a free order of the bread knots, so this was a great way to start!


Jesse and I decided that we wanted to share the Mom & Pop specialty pizza... it had a buttermilk ranch base, gouda, cheddar, mozzarella, provolone, and bacon all on top of their fresh house-made dough.  This pizza was unbelievable!  I also added green peppers to my side, and that made it even better.  It was perfect with a glass of sweet tea... another cool thing is that all beverages are served in mason jars!


Here is a picture of the whole group!  Katie and everyone else at Big Mike's did an amazing job... delicious food, friendly service, and an overall pleasant dining experience.  We had a great time with dinner, and most of us decided to continue hanging out at the next place.


We all went to the
The Quirky Feather Confectionery and were greeted very warmly.  They were excited to see us and were extremely helpful with the new faces we had brought in.  We all got our respective desserts (I got the peanut butter cup cheesecake... so good) and beverages, got a table together, and played the Mars Attacks dice game.


All-in-all, this was a delicious evening with some great company.  We would all like to thank both Big Mike's Café and The Quirky Feather Confectionery for helping make this food crawl a success!  We hope that, next year, we can get even more people involved!
 
#Google #LocalGuides #Indianapolis #Indiana #local #Indy

15 June 2016

Quick and Easy Vegan Teriyaki Lettuce Wraps!

While browsing through the grocery department at Target recently, I found something in the freezer section that sounded pretty interesting... meatless teriyaki "chicken" strips (http://www.target.com/p/teriyaki-meatless-chicken-9-oz-simply-balanced/-/A-16379898).  They are essentially firm tofu strips that you can microwave in the bag, cooking them in the included teriyaki sauce.  I was not even aware that Target carried specialty items like that, so I thought I would give it a try.

We decided to try it in lettuce wraps, for a light dinner idea.  For the filling, I combined sweet corn and cherry tomatoes in a blend of sesame and sunflower oils with some minced garlic... I sautéed them all together in a cast-iron pan and then roasted the mixture in the oven for about 15 minutes to get a nice char on the corn.  To keep it quick and easy, I cooked the "chicken" strips in the microwave per the directions on the package.  When it was all together, we laid out some large leafs of romaine and filled them with both the corn mixture and the strips.

It really turned out great!  Normally I am not huge on using "fake" meats like this, but I am glad we decided to give this a try.  The meatless strips really had a nice texture and flavor, despite being cooked in the microwave.  Serving everything in the lettuce leaves made it a really light meal... and it was vegan!  Quick and easy, vegan, light, and delicious... this was definitely a winning combination when trying to have a fast supper.

Lettuce wraps, served with a side of fresh cucumber spears.

12 June 2016

Saturday 18 June - Google Local Guides Meet-Up Day - Indianapolis, IN


This Saturday (18 June) is Google Local Guides Meet-Up Day, and I am organizing short food crawl for the Indianapolis area!

We will start at Big Mike's Cafe at 96th & College for dinner, then move on to The Quirky Feather Confectionery at 116th & Guilford for desserts, coffee, and tabletop games.
 
The purpose of these events is to hopefully bring together different people that enjoy discovering local gems, reviewing places on Yelp an Google Maps, and simply enjoying awesome food. This is my first time organizing one of these, and I am hoping to really get some community involvement.

If you would like to join in, please go to the event page and RSVP ASAP so that I can let Big Mike's know how many to expect. Thank you all for your time, and hope to see you there!
https://www.facebook.com/events/970228369762025/


#google #LocalGuides #Indianapolis #Indiana

09 June 2016

Homemade Meal-Replacement Protein Bars!

Typically I try not to eat a whole meal for lunch... it's part of my effort to watch what I eat.  My idea is that, if I eat normal portions for breakfast and dinner, and simply replace my lunch, I should improve... and I have.

I have been eating one of the peanut butter chocolate Clif Builder's bars to get me through the day.  They are pretty high in protein but they don't really satiate me, plus they are just too sweet.  There are no other protein bars available at the store that really satisfy me, so I decided to make one myself!

The recipe is pretty simple...

  • 1 cup of Silk vanilla coffee creamer
  • 5 scoops of Kroger whey/soy protein powder
  • 1 heaping cup of peanut butter
  • 4.5 cups of quick oats


You can use any other non-dairy milk or even regular milk if you want; I am partial to soymilk, and I used this creamer because it has an extra creamy texture (only trade-off is that it has very little protein in it, unlike normal soymilk).  I also wanted to use only soy protein powder, but there was no Kroger brand of only soy :(... this deserves further shopping around.  As for the peanut butter, I personally prefer reduced fat creamy peanut butter.

Pretty easy procedure:

  1. Whisk the milk, to aerate a bit
  2. Add the protein powder and whisk together until smooth
  3. Add peanut butter and mix well (might want to use a spoon)
  4. Add quick oats and combine with your hands (use gloves to prevent messy hands)
  5. Place mixture in a small casserole dish lined with parchment paper, and flatten to be even all the way across
  6. Chill overnight and cut into 8 pieces; wrap individually and freeze to enjoy later!


Here is some nutrition info... I actually calculated these myself:

  • Serving size = 133g (1/8 of total mixture)
  • 24g protein per serving
  • 13g sugar per serving
  • (unsure of calories or fat content)

By comparison... the Clif Builder's bars are 68g total mass each, with 20g protein and 21g sugar.  So these will be much more filling, with more protein and less sugar!

It did come out a little dense, but I think that will help it be filling.  It also came out pretty sticky... so make sure you have napkins, haha.  I plan to try it with half cereal (maybe puffed rice) and half oats next time for some texture.


This is a variation of a visual recipe found at darebee.com

07 June 2016

Google Local Guides Meet-Up Day - Indianapolis


Next Saturday (18 June) is Google Local Guides Meet-Up Day, and I am organizing the only one so far for the Indianapolis area!

We will be doing a short food crawl. We will start at Big Mike's Cafe at 96th & College for dinner, then move on to The Quirky Feather Confectionery at 116th & Guilford for desserts, coffee, and tabletop games.
 
The purpose of these events is to hopefully bring together different people that enjoy discovering local gems, reviewing places on Yelp an Google Maps, and simply enjoying awesome food. This is my first time organizing one of these, and I am hoping to really get some community involvement.

If you would like to join in, please go to the event page and RSVP ASAP so that I can let Big Mike's know how many to expect. Thank you all for your time, and hope to see you there!
https://www.facebook.com/events/970228369762025/

#google #LocalGuides #Indianapolis #Indiana

23 May 2016

Homemade purple potato chips!

Sam and I had some leftover purple potatoes and decided to try making chips!

We sliced them nice and thin on the mandolin; tossed them in olive oil; topped them with sea salt, oregano, rosemary, and dehydrated garlic; and baked them at 350° for about 10-15 minutes.  Once they were put of the oven, we topped them with just a little extra salt.

They came out wonderfully crispy!  Despite being coated in olive oil, they did not taste too greasy or heavy.  It's an awesome way to use leftover potatoes that aren't enough to go in a main dish!


12 May 2016

Started our patio garden for this year!

Sam and I started our patio garden!  We have some red and blue flowers in the hanging basket (can't remember what they are called); in the planters, we have prairie sage, Italian basil, raspberry lettuce, purple peppers, and spearmint!

Definitely excited to use the purple peppers and basil in my Italian recipes... and to use the lettuce in salads and on sandwiches!


11 April 2016

Quick and easy mushroom alfredo!

Being Italian, I have made all kinds of pasta sauces countless times... alfredo included.  I even once won a pasta sauce cook-off with my classic alfredo recipe, despite the fact that it was the only sauce without meat.

The thing about that alfredo is that it's completely unhealthy... and expensive to make.  It's mostly made of heavy cream, butter, and fresh-grated Romano cheese.  The cream and butter make it super high in fat, and the cheese is expensive.

This new recipe, while not a traditional alfredo, has all the flavor of the classic and then some... and it's not quite as bad for you and much less expensive!  I got the idea from a coworker and tweaked it a bit... thanks, Ian!

I start it off by sautéing some sliced mushrooms in olive oil in a large, deep saucepan... just to the point that they are soft.  I then add a large can of condensed cream of mushroom soup, and about half that can worth of skim milk (or more or less depending on your consistency preference) as well as some dried oregano, basil, parsley, and white pepper to taste.  Then, I slowly stirred in about 6oz of grated Romano and let it simmer.  While doing all of that, I cooked some Barilla rotini made with zucchini and spinach (a wonderful way to add some veggies in your meals!), and I added it to the sauce. 

The creaminess from the condensed soup gives it a really lovely consistency, even without the butter and heavy cream... and starting it off by sautéing mushrooms really ups the flavor!

It turned out awesome... honestly it is now my preferred way to make alfredo at home.  It goes great with homemade garlic bread!


24 March 2016

Vegetarian Italian Zucchini "pasta" sauté!

This dish is quick and easy, not to mention relatively healthy!

First, I shredded some fresh zucchini as my "pasta", making sure not to peel it (I love the skin!).  I heated my big cast-iron skillet and sautéed some shallots and halved grape tomatoes in avocado oil.  I then added some mini sweet pepper rings and minced garlic... the aroma at this point was already irresistible!

For protein, I used Tofurky Italian sausages, sliced into coins... not to replace a real sausage, but I just love the flavor of them!  I added these to the skillet, and stir-fried everything together until hot.  Finally, I added my shredded zucchini and a small jar of pesto, cooking until the zucchini was al dente.  I served it with some grated parmesan on top.

It turned out perfectly!  Honestly, it was hard to tell the difference between pasta and the shredded zucchini, and I'm Italian!  It was a relatively light meal too, so it didn't sit too heavily.

It could easily be made vegan by omitting the pesto and parmesan, and adding extra oil with the shredded zucchini to make it a more aglio olio style.  Give it a try, it's super easy!


12 February 2016

Shakshuka!

Ever since I first received cast-iron cookware, I have seen many people online making this tomato-sauce-and-eggs dish that looks wonderful and I never knew what it was.  After researching, I decided to make shakshuka for the first time last night!

I started it just like my normal tomato sauce... sautéing onions and garlic in oil.  I added crushed tomatoes, oregano, basil, sweet peppers, fresh baby broccoli, and fresh spinach.  After letting all of that simmer together a bit, I crumbled some feta cheese on top and cracked some fresh eggs.  I popped it in the oven and let it bake... and it came out very nicely!  I meant to try and leave the yolks a little runny, but I let it bake a little too long.  Even though I cooked the yolks through, it came out to be delicious!  I served it with some garlic bread and it was definitely a comfort food!


30 January 2016

Vegetarian goulash!

I entered into a chili cook-off here at my apartment complex!  I decided that I wanted to make something a little different from the normal beans-and-beef chili... so I thought about making it vegetarian-friendly.

Rather than just leaving that protein portion out, I made my own vegetarian version of Italian sausage.  I used LightLife vegetarian ground sausage for the base.  I ground up my own fresh whole fennel seeds using a real mortar & pestle... I got both the fennel and the mortar & pestle from Artisano's Oils & Spices here in Indianapolis (highly recommended!).


I added that to the sausage with some green pepper and a touch of oil, and browned it in a skillet just like real ground sausage!  The texture and flavor were spot-on!

For the goulash, I started it by sautéing onions and garlic in a garlic-flavored coconut oil.  Then I added crushed tomatoes, salt, oregano, basil, rosemary, white pepper, and the rest of my ground fennel.  After mixing that in, I added a generous amount of grated Romano cheese and the browned "sausage".  While all of that was simmering, I boiled some pasta water, to add ditalini to the goulash.  I also did a quick sauté of some baby sweet peppers and kidney beans.

Once the pasta was done, I stirred everything together and it was complete.  It came out amazing!  The people that tasted it couldn't even tell there was not meat in it... the freshly hand-ground fennel make a world of difference.  All of the flavors and textures came through nicely, and it was definitely comfort food.  Also, since it had a high proportion of vegetables and no meat, it was not too heavy.

... not to mention, I won the cook-off! :)


26 January 2016

Homemade mutter paneer!

I finally tried making my own masala sauce... and it turned out to be almost identical to the flavor of the same thing at India Garden, my favorite Indian restaurant in Indianapolis!

I started it the same way I start my Italian pasta sauces, by sautéing onions and garlic in oil... except instead of olive oil I used a garlic-flavored coconut oil I got on clearance at Kroger.  I'm glad I did, because it worked out well... it did not splatter quite as much as olive oil usually does, and the coconut flavor and aroma went well in the dish.  Then I added crushed tomatoes, a little bit of sugar, some dried cilantro, and a generous amount of Madras curry powder.

 Once the powder dissolved in I added peas, paneer cheese, and enough heavy cream to get it to just the right orange color.

After letting that simmer for about 20 minutes on low heat, I served it with some fragrant basmati rice and garlic naan... and it was absolutely perfect!  I don't typically like much heat, but if you want it spicy, just add crushed red pepper and there you go!  This is pretty easy to make and it's just as good as what you get in a restaurant.